
Fall is here and if you want to add some instant cozy to your home, candles are the way to go. They just add the loveliest dose of warmth and calm to a space, don’t they?!
While there are many lovely options available for purchase, simple hand-poured candles are incredibly easy to make at home with a few basic supplies—mainly wax, wicks and containers. Luckily, the required materials are both readily available and affordable, which makes this project a must do. The best part about it? You can rescue all of your old glass candle vessels, food jars, skincare containers and mason jars and give them new life!
Supplies
- soy wax flakes
- natural wooden or cotton wicks
- heat-safe glass containers from your recycling bin
- small pot
- large glass jar
- wooden chopsticks
- essential oils of your choosing
- ice pop sticks or clothespins
- dried herbs, flowers or spices (optional)
Make it
- PREP: Clean your candle vessels in hot soapy water and remove any labels. Lemon essential oil is excellent for removing sticky residue. Prepare your work surface by covering with parchment or newspaper.
- Melt: Fill a glass large jar about ¾ full with soy wax flakes. Fill a pot about half full with water. Place the glass jar into the pot of water and heat on the stove over medium-low heat, carefully stirring the wax with a wooden chopstick. This part takes time—you want to slowly let the wax melt while keeping its temperature as low as possible. Once the wax has fully melted and is transparent with no solid chunks, turn off the heat and carefully take the jar out of the pot.
- Wick: Dip the base of a wick into the melted wax and place in the centre of a candle vessel, gently pressing and holding in place until the wax hardens. Repeat for the remainder of the wicks and candle vessels.
- Scent: Add your essential oils to the melted wax and use the chopstick to stir the oil in well. Scent is very personal, but about 20–25 drops of essential oil per 8 ounce candle will usually make for a nicely-scented candle.
Once the wax has been removed from the heat, let the wax cool 5–10 minutes before pouring, so you can take your time with this step. - Pour: Once the melted wax has cooled enough for the jar to be handled but is still fully transparent, it’s time to pour! Carefully fill each of the candle vessels, leaving some space at the top. Use ice pop sticks or clothespins to keep the wick centred and straight.
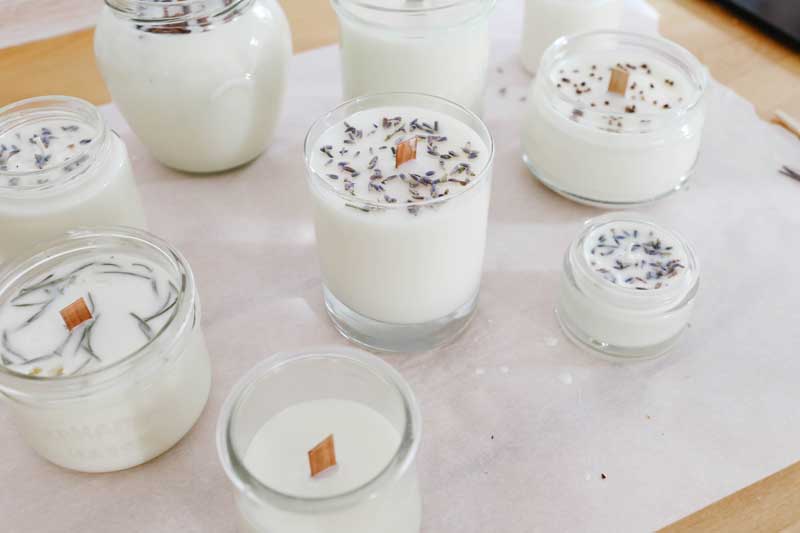
- Cool: Allow the wax to solidify before moving the candles. If you’d like to add any decorations on top like dried herbs, flowers or spices, wait until the candles are almost fully solidified then gently place the decorations on top. (Important: When choosing any decorations, be sure to keep flammability in mind.)
- Cure: This is possibly the most difficult part—allowing your candles to cure for one to two weeks before lighting them. Ugh…it’s no fun waiting, but it’s definitely worth it. Allowing your candles the time needed to cure will improve their scent, give them a longer burn time and increase their burn quality, meaning they’ll burn more evenly with minimal tunnelling. The curing process works best in a cool, dry spot, away from direct sunlight.
- Trim: Cut each wick to about ¾ centimetre long. You’re now ready to enjoy the candle yourself or tie with a pretty piece of twine or ribbon and give as a gift.
Open The Good Life to see all the steps.
Jen Kossowan is a kindergarten and grade one teacher and a mom to two gorgeous kids. She’s passionate about education, loves a good DIY project, and can often be found in the kitchen whipping up something delicious. She started Mama.Papa.Bubba. on a whim while living in the Middle East and has been sharing recipes, activities and travels online ever since.
Learn more: mamapapabubba.com | IG: @mamapapabubba